Multi-query pane
The multi-query pane is part of the Multi-query center page. Please consult that page for general search tips.
- Recent queries folder
- Older queries folder
- Trash folder
- Toolbar buttons
- Tree view (left)
- List view (right)
- Results caching
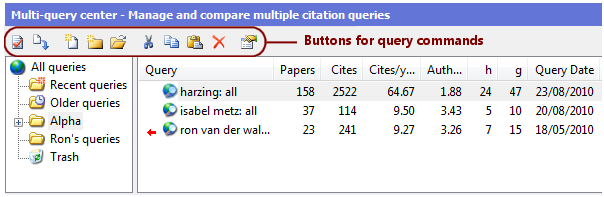
The multi-query pane consists of a tree view on the left, a list view on the right, and a toolbar across the top, as shown in the following screen shot.
Icons
The following icons are used in the multi-query tree and list views.
| Icon | Description |
|---|---|
| Recent queries folder | |
| Older queries folder | |
| Trash folder | |
| (folder) | Regular folder |
| (globe) | Tree root |
| (search globe) | Query results |
| (import doc) | Imported external data |
 Recent queries folder
The Recent queries folder is always the first folder in the multi-query tree. It receives copies of all new queries that you perform on the Author impact, Journal impact, and General search pages. You can leave the queries where they are, drag & drop them to another folder, copy or cut them to the Windows clipboard, or just delete them.
Publish or Perish stores queries performed on the Author impact, Journal impact, and General search pages in the Recent queries folder subject to the following rules:
- If you execute a query that is already present in the Recent queries folder, then the existing copy is updated with the new results.
- If you execute a query that is not present in the Recent queries folder but is present in the Older queries or Trash folders, then it will be moved back to the Recent queries folder.
- If you execute a query that is not present in any of the special folders mentioned above, then a new copy will be created and added to the Recent queries folder (even if the same query is present in another, user-defined folder).
On the other hand, if you create a new query or edit an existing query directly in the multi-query center, then the Recent queries folder is not involved (unless you create or modify a query in it).
 Older queries folder
The Older queries folder is always the second folder in the multi-query tree. It is used as a holding area for queries that are no longer very recent but that you may wish to revisit at some point. Queries are automatically moved from the Recent queries folder to the Older queries folder after they reach a preset age. You can change the age threshold in the Preferences - Queries dialog box, reached through the Tools > Preferences command on the main menu.
If queries in the Older queries folder are older than a second age threshold, they are automatically moved to the Trash folder.
 Trash folder
The Trash folder is always the last folder in the multi-query tree. It receives all queries and other folders that you delete elsewhere in the multi-query tree, just like the Windows Recycle Bin or the Mac OS X Trash. In addition, it also receives queries that are older than the maximum age for the Older queries folder.
With the introduction of the Trash folder, the behavior of the Delete and Cut commands has changed somewhat:
- If you use these commands on a folder or query in the Trash folder, then the removal of the items is permanent; you will be asked to confirm the deletion in that case (only for the Delete command; the Cut command will place a copy of the item on the Windows clipboard and then delete the original outright).
- If you use these commands on a folder or query not in the Trash folder, then the selected item(s) will be moved to the Trash folder without further ado. If you want to restore them, you can retrieve them from the Trash folder and drag & drop them to a regular folder. (The Cut command will in addition leave a copy of the item(s) on the Windows clipboard.)
If queries in the Trash folder are older than a preset age, they are automatically deleted permanently. You can change this preset age in the Preferences - Queries dialog box, reached through the Tools > Preferences command on the main menu.
Toolbar buttons
Across the top of the multi-query pane is the toolbar that contains the commands for the Multi Query Center. Not all commands are available at all times; for some commands (for example, Lookup and Lookup Direct) you must first select a query in the list on the right before the command becomes active. Unavailable commands are grayed out.

| Command | Description | Shortcut |
|---|---|---|
| Lookup |
Click this button to perform the query. If possible, the query is satisfied from the local Publish or Perish cache; this saves time and reduces the load on Google Scholar. If no cache entry for the query exists or the entry is older than the maximum cache age, then the query is forwarded to Google Scholar. After the results are received from Google Scholar, the local cache is automatically refreshed. Tip: You can change the maximum cache age in the Preferences - Queries dialog box, which is accessible through the Tools > Preferences command. Warning: If you have more than a few queries selected when you issue this command, then Google Scholar may start refusing the lookup requests because of an excessive number of requests. In that case you must wait a few hours before retrying the queries, preferably with fewer queries selected. |
Ctrl+L |
| Lookup Direct |
Click this button to send the query directly to Google Scholar, bypassing the local Publish or Perish cache. This may be useful if you suspect that Google Scholar may have newer information available than is available through the local cache. When the results are returned from Google Scholar, the local cache is automatically refreshed. Note: It is not useful to perform multiple direct lookups for the same query shortly after another; this merely increases the load on Google Scholar and increases the chance that your computer may be temporarily denied access by Google Scholar. We recommend that you only use the Lookup Direct function as a last resort. Warning: If you have more than a few queries selected when you issue this command, then Google Scholar may start refusing the lookup requests because of an excessive number of requests. In that case you must wait a few hours before retrying the queries, preferably with fewer queries selected. |
Ctrl+Shift+L |
| New Query | Click this button to create a new query. It will be placed in the currently selected folder (or in the parent folder of the currently selected query). | |
| New Folder | Click this button to create a new query folder under the current folder. | |
| New Import | Click this button to import external data into Publish or Perish. | |
| Cut |
Click this button to copy the currently selected folder or queries to the Windows clipboard and delete them from their current position. You can then paste them into a different folder. Note: As of Publish or Perish version 3.4, the deleted items are moved to the Trash folder rather than deleted outright, unless the items are already in the Trash folder; then they will be permanently deleted. |
Ctrl+X |
| Copy | Click this button to copy the currently selected folder or query to the Windows clipboard. You can then paste it into a different folder. | Ctrl+C |
| Paste | Click this button to paste the folder or query on the Windows clipboard into the current folder. | Ctrl+V |
| Delete |
Click this button to delete the currently selected folder or query. If you delete a folder, all queries in it are also deleted.
|
Delete |
| Properties | Click this button to edit the currently selected folder or query. | Alt+Enter |
Tree view (left)
The tree on the left displays the available query folders. The folders are containers that help you organize your queries. The tree always contains the Recent queries folder. This folder automatically receives the queries that you perform on one of the other citation analysis pages. You can also add your own queries to this folder and edit existing queries.
Query folders can be nested, and they can be rearranged by dragging and dropping with the mouse. They can also be copied (Ctrl+C), cut (Ctrl+X), and pasted (Ctrl+V).
Tree view sorting order
The tree view is automatically sorted by folder name, with the following exceptions:
- The Recent queries folder always appears first;
- The Older queries folder always appears second;
- The Trash folder always appears last.
Tree view popup menu
If you right-click on any of the folders in the tree view, a popup menu appears with the following commands.
| Command | Description | Shortcut |
|---|---|---|
| New Query | Creates a new query. It will be placed in the currently selected folder. | |
| New Folder | Creates a new query folder under the current folder. | |
| New Import | Imports external data into Publish or Perish. This command is currently only partially implemented and only supports CSV data that was previously exported from Publish or Perish and RefMan/RIS data that was exported from the ISI Web of Science. | |
| Rename | Allows in-place editing of the folder name. Some folders, such as the Recent queries folder, cannot be renamed. | F2 |
| Properties | Opens the Properties dialog box for the currently selected folder. | Alt+Enter |
| Cut |
Copies the currently selected folder to the Windows clipboard and delete it from its current position. You can then paste it into a different folder. Note: As of Publish or Perish version 3.4, the deleted folder is moved to the Trash folder rather than deleted outright, unless the folder is already in the Trash folder; then it will be permanently deleted. |
Ctrl+X |
| Copy | Copies the currently selected folder to the Windows clipboard. You can then paste it into a different folder. | Ctrl+C |
| Paste | Pastes the folder or query on the Windows clipboard into the current folder. | Ctrl+V |
| Delete |
Deletes the currently selected folder. If you delete a folder, all queries in it are also deleted.
|
Delete |
| Empty Trash | Permanently removes all contents from the Trash folder. Be careful if you use this command; once deleted, the previous contents of the Trash folder cannot be retrieved. (You can, however, re-create the queries and rely on the Publish or Perish cache to quickly retrieve the previous results.) |
List view (right)
The list on the right displays queries similar to the queries that you enter on the other pages, but presented in a condensed format. Queries can be moved between folders by dragging and dropping them with the mouse. They can also be copied (Ctrl+C), cut (Ctrl+X), and pasted (Ctrl+V).
The list view displays the following columns.
| Column | Description |
|---|---|
| Query | An abbreviated rendering of the query parameters, intended as a reminder about the query. To see all query parameters, press Alt+Enter to open the Edit Query dialog box. |
| Papers | The number of results (~papers) returned by the query. |
| Cites | The total number of citations returned by the query. |
| Cites/year | The total number of citations in the query divided by the number of years spanned by the results. |
| Authors/paper | The average number of authors per paper in the query results. |
| h | Hirsch's h-index calculated for the query results. |
| g | Egge's g-index calculated for the query results. |
| Query Date | The date on which this query was last performed (see Results caching below). |
| Cache Date | The date on which the query data were last retrieved from Google Scholar (see Results caching below). |
List view sorting order
By default, the items in the list view are sorted on the query name. You can re-sort them by clicking on a column header; this will cause the list to be sorted on the contents of that column. Clicking on the same column header a second time reverses the sort order. The last used sorting order is retained even when you display a different folder in the list view.
Note that some columns sort in ascending order by default, while others default to sorting in descending order. This is done because for some columns (for example the h-index or the total number of citations) the most important items are the ones with the highest value and are therefore best presented in descending order. You can always reverse the order by clicking on the same column header again.
List view popup menu
If you right-click on any of the queries in the list view, a popup menu appears with the following commands.
| Command | Description | Shortcut |
|---|---|---|
| Lookup |
Performs all selected queries. If possible, the queries are satisfied from the local Publish or Perish cache; this saves time and reduces the load on Google Scholar. If no cache entry for a query exists or the entry is older than the maximum cache age, then the query is forwarded to Google Scholar. After the results are received from Google Scholar, the local cache is automatically refreshed. Tip: You can change the maximum cache age in the Preferences - Queries dialog box, which is accessible through the Tools > Preferences command. Warning: If you have more than a few queries selected when you issue this command, then Google Scholar may start refusing the lookup requests because of an excessive number of requests. In that case you must wait a few hours before retrying the queries, preferably with fewer queries selected. |
Ctrl+L |
| Lookup Direct |
Sends all selected queries directly to Google Scholar, bypassing the local Publish or Perish cache. This may be useful if you suspect that Google Scholar may have newer information available than is available through the local cache. When the results are received from Google Scholar, the local cache is automatically refreshed. Note: It is not useful to perform multiple direct lookups for the same query shortly after another; this merely increases the load on Google Scholar and increases the chance that your computer may be temporarily denied access by Google Scholar. We recommend that you only use the Lookup Direct function as a last resort. Warning: If you have more than a few queries selected when you issue this command, then Google Scholar may start refusing the lookup requests because of an excessive number of requests. In that case you must wait a few hours before retrying the queries, preferably with fewer queries selected. |
Ctrl+Shift+L |
| Mark for Lookup | Marks the selected query or queries for a new lookup. This is meant to prepare for batch-style processing inconjunction with the Edit > Lookup Pending Queries command. | |
| New Query | Creates a new query. It will be placed in the the parent folder of the currently selected query. | |
| New Folder | Creates a new query folder under the current folder. | |
| New Import | Imports external data into Publish or Perish. | |
| Save As BibTeX... | Saves all currently selected queries results in BibTeX format, encoded as Unicode UTF-8. | |
| Save As CSV... | Saves all currently selected queries results in comma-separated format, encoded as Unicode UTF-8. | Ctrl+S |
| Save As EndNote... | Saves all currently selected queries results in EndNote Import format, encoded as Unicode UTF-8. | Ctrl+Shift+S |
| Save As RefMan/RIS... | Saves all currently selected queries results in Reference Manager (RIS) format, encoded as Unicode UTF-8. | |
| Copy Statistics as Text | Copies the citation metrics of all currently selected queries to the Windows clipboard in plain text format. You can then paste this text into other applications. | |
| Copy Statistics as CSV | Copies the citation metrics of all currently selected queries to the Windows clipboard in CSV (comma-separated value) format. You can then paste this into other applications for further processing. | |
| Copy Statistics as CSV with Header | Does the same as the previous command, but precedes the statistics with an extra line that contains the names of the fields, also in comma-separated format. | |
| Copy Statistics for Excel | Copies the citation metrics of all currently selected queries to the Windows clipboard in tab-separated format. You can then paste this into other applications for further processing, and in particular into spreadsheet applications such as Microsoft Excel, OpenOffice Calc, and SoftMaker's PlanMaker. | |
| Copy Statistics for Excel with Header | Does the same as the previous command, but precedes the statistics with an extra line that contains the names of the fields, also in tab-separated format. | |
| Rename | Allows in-place editing of the query name. Only imported data queries can be renamed. | F2 |
| Properties | Opens the Properties dialog box for the first selected query. | Alt+Enter |
| Cut |
Copies the currently selected queries to the Windows clipboard and delete them from their current positions. You can then paste them into a different folder. Note: As of Publish or Perish version 3.4, the deleted items are moved to the Trash folder rather than deleted outright, unless the items are already in the Trash folder; then they will be permanently deleted. |
Ctrl+X |
| Copy | Copies the currently selected queries to the Windows clipboard. You can then paste them into a different folder. | Ctrl+C |
| Paste | Pastes the folder or query on the Windows clipboard into the current folder. | Ctrl+V |
| Delete |
Deletes the currently selected queries.
|
Delete |
Results caching
Publish or Perish uses a local cache for the data returned by queries. If you re-run a query, then Publish or Perish will retrieve the results data from the local cache instead of contacting Google Scholar again, provided that the cached data is still "fresh". If the cached data is too old, or if no cached data exists, then Publish or Perish sends the query to Google Scholar and stores the new results in the local cache for subsequent use.
The Query Date and Cache Date columns in the list view show the status of the query and cached data.
- Query Date is the date on which you last performed the query, i.e., last issued the Lookup [Direct] command.
- Cache Date is the date on which the data were last retrieved from Google Scholar.
Typically, the Query Date is the same or more recent than the Cache Date. If the Query Date is more recent, this means that the query on that date used the cached results rather than contacting Google Scholar. This is normal behavior.
Out-of-date cached data
If the Cache Date is too long ago or missing altogether, then the list view will display a small red arrow in front of the query. This means that the Cache Date is exceeds the maximum cache age specified in the Preferences - Queries dialog box.
In the case of out-of-date cached data, Publish or Perish will resubmit the query to Google Scholar the next time that you use the Lookup command. This happens automatically when you issue that command; you do not have to do anything special for that.
If you want to refresh the cache before the data expires, use the Lookup Direct command. This might occasionally turn up some extra results, but there is no point in using Lookup Direct more than once every few days; this merely increases the load on Google Scholar and increases the risk that your lookup request will be refused. Under normal circumstances you should rely on Publish or Perish's automatic caching implementation.